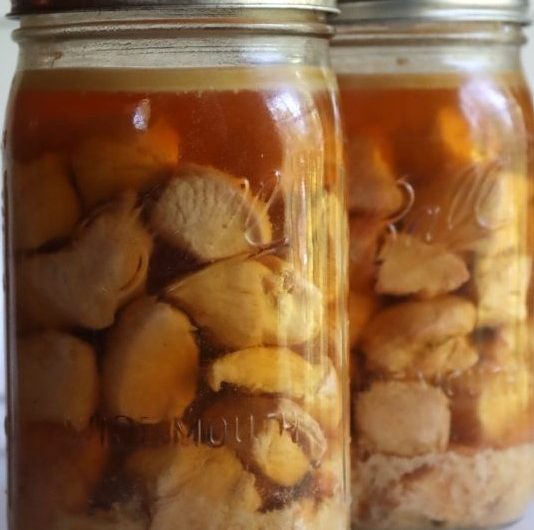
If you’re looking for an easy and reliable way to stock up on protein-rich meals, pressure canning chicken at home is a must-have skill in your kitchen arsenal. Whether you’re a homesteader, meal prepper, or just looking to save freezer space, learning how to home can chicken gives you a shelf-stable option that’s flavorful, nutritious, and ready to eat at a moment’s notice.
This method ensures your chicken is preserved safely without relying on electricity. Using a pressure canner is the only USDA-approved method for safely canning poultry at home, and the results are incredibly satisfying: tender, juicy chicken pieces infused with rich broth, waiting in your pantry for soups, stews, salads, tacos, casseroles, or just quick meals.
Let’s dive into how to preserve chicken at home using pressure canning—step by step.
Why Pressure Canning Chicken at Home Is a Game-Changer
Pressure canning is ideal for preserving low-acid foods like meats and poultry. The high temperature achieved in a pressure canner (240°F or 116°C and above) is essential to eliminate harmful bacteria like Clostridium botulinum. Chicken is a perfect candidate for pressure canning because it holds up well to the heat and becomes even more tender after the process.
The best part? Home-canned chicken saves time on busy nights, requires no refrigeration until opened, and is ideal for bulk prepping or when you have leftover cooked poultry.
Ingredients You’ll Need
Fresh chicken (bone-in or boneless, with or without skin)
Chicken broth (homemade or store-bought)
Salt (optional, for taste)
These three simple ingredients are all you need to can chicken at home safely and deliciously.
How To Can Chicken
🧼 Step 1: Prepare Your Chicken
If you’re starting with whole chickens, begin by breaking them down into manageable pieces—thighs, drumsticks, breasts, or smaller chunks. You can leave the skin on for extra flavor or remove it if you prefer less fat in your jars.
Pro tip: Save the bones and leftover parts to make your own chicken broth. Roasting the carcasses adds rich flavor and gives you a nutrient-dense base to pack your jars with.
Whether you opt for raw or pre-cooked chicken, both methods work. However, browning or roasting the meat first (hot pack) yields better texture and taste.
🫙 Step 2: Get Your Jars and Lids Ready
Sterilize wide-mouth mason jars, lids, and rings. Preheat your pressure canner according to the manufacturer’s directions. You’ll want hot jars to meet hot meat and broth, maintaining proper temperatures for safety.
Use a canning funnel and jar lifter for ease and safety during the packing process.
🍳 Step 3: Sear the Chicken for Hot Pack Method (Optional but Recommended)
In a large skillet, lightly brown your chicken pieces in oil over medium-high heat. This step helps lock in flavor and remove excess moisture.
Once browned, immediately pack the hot meat into jars, leaving 1 1/4 inch of headspace at the top. This space is crucial for proper sealing.
🧂 Step 4: Add Salt and Broth
If you’re using salt, add about 1 teaspoon per quart or 1/2 teaspoon per pint. This enhances the flavor but is entirely optional.
Pour boiling chicken broth (or water if you prefer) over the meat, keeping that 1 1/4 inch headspace. Use a bubble remover or plastic spatula to eliminate trapped air. Adjust liquid levels as needed.
🔒 Step 5: Seal the Jars
Wipe the jar rims clean with a cloth dipped in vinegar or warm water to remove any oil or residue. This ensures a strong seal. Affix the lids and screw on the bands until fingertip-tight—don’t overtighten.
🧯 Step 6: Load and Vent the Pressure Canner
Carefully place your sealed jars into the canner following the manufacturer’s instructions. Lock the lid but don’t start building pressure yet.
Allow the canner to vent steam for 10 full minutes before adding the weight or locking the pressure mechanism. This step ensures the chamber is filled with pure steam and helps prevent air pockets from forming inside the jars.
🌡️ Step 7: Pressure and Processing Time
Set your pressure according to your altitude and your canner type. Use the following guidelines:
For Dial-Gauge Pressure Canners:
0 to 2,000 ft: 11 psi
2,001–4,000 ft: 12 psi
4,001–6,000 ft: 13 psi
6,001–8,000 ft: 14 psi
Above 8,000 ft: 15 psi
For Weighted-Gauge Pressure Canners:
0 to 1,000 ft: 10 psi
Above 1,000 ft: 15 psi
Start your timer only after the canner reaches full pressure. Use these time guidelines:
Boneless chicken: 75 minutes (pints) | 90 minutes (quarts)
Bone-in chicken: 65 minutes (pints) | 75 minutes (quarts)
❄️ Step 8: Cool Down and Seal Check
Once the timer finishes, turn off the heat and let the canner return to zero pressure naturally. Do not force it open. This process could take up to an hour.
After opening, use a jar lifter to place the jars on a towel-lined counter and let them cool undisturbed for 12–24 hours.
Check for a proper seal (lid should not flex when pressed). Store sealed jars in a cool, dark place. Any unsealed jars should be refrigerated and used within a few days.
Storage Tips and Shelf Life
Properly canned chicken can last 12 to 18 months in your pantry. For best results:
Remove the canning bands before storing
Label jars with date
Store in a cool, dark place (not near a stove or heater)
Once opened, store leftover chicken in the fridge and consume within 3–4 days.
Raw Pack vs. Hot Pack Method
Raw pack: Pack uncooked chicken into jars with no added liquid. The chicken will release juices during processing.
Hot pack (recommended): Brown or roast the chicken, then pack with hot broth. Results in better texture and shelf life.
Flavor Enhancers (Optional Additions)
Though the basic recipe is simple, you can safely add the following to your jars for extra flavor (use in moderation):
A garlic clove per jar
A bay leaf
A pinch of dried herbs like thyme or rosemary
Onion slices
Do not add dairy, flour, or starchy vegetables like potatoes—these are not recommended for canning.
Most Popular Uses for Home-Canned Chicken
Quick chicken soup or stew
Chicken tacos or burritos
Instant chicken salad
Stir-fries
Pot pies
High-protein snack
Frequently Asked Questions
Can I can chicken without a pressure canner?
No. Pressure canning is the only safe way to preserve low-acid foods like chicken. Water bath canning is not safe for meat.
How long does canned chicken last?
When stored properly, canned chicken retains peak quality for 12–18 months but may still be safe beyond that if the seal remains intact.
Can I use rotisserie or leftover cooked chicken?
Yes! Roasted, grilled, or leftover cooked chicken works great. Just make sure it’s still moist and not overly dry.
Is it okay to can chicken with bones?
Absolutely. Bone-in chicken adds flavor and richness to the broth. Just adjust your processing time accordingly.
Do I need to add broth?
No, water works fine, but chicken broth adds extra flavor and nutrition.
Canned Chicken Recipe
Canning chicken at home not only gives you convenient meals at your fingertips but also saves freezer space and reduces food waste. With just a little prep and the right tools, you’ll be enjoying shelf-stable chicken that tastes like it was cooked fresh.
Prep Time: 1 hour
Cook Time: 1 hour
Canning Time: 1 hour 30 minutes
Total Time: 3 hours 30 minutes
Tools You’ll Need:
Pressure canner
Wide-mouth mason jars
Jar lifter
Canning funnel
Lids and rings
Ingredients:
Chicken (whole, bone-in, or boneless)
Chicken broth (or water)
Salt (optional)
Instructions:
Break down whole chickens or use pre-cut chicken pieces.
Roast bones to make homemade broth or use store-bought chicken broth.
Preheat pressure canner and sterilize jars and lids.
Brown chicken pieces in a skillet (optional hot pack method).
Pack chicken into jars leaving 1 1/4″ headspace.
Add salt: 1 tsp per quart or 1/2 tsp per pint (optional).
Pour in boiling broth, de-bubble, and adjust headspace.
Wipe rims, secure lids, and load jars into canner.
Vent steam for 10 minutes before bringing to pressure.
Process jars at correct pressure and time (see table above).
Let canner cool naturally before opening.
Check seals. Store sealed jars in pantry; refrigerate unsealed ones.
Nutrition (per 1 cup serving):
Calories: 232 kcal
Carbohydrates: 7g
Protein: 41g
Fat: 4g
Saturated Fat: 1g
Cholesterol: 121mg
Sodium: 2437mg
Potassium: 852mg
Sugar: 2g
Calcium: 26mg
Iron: 1mg
Note: Nutrition may vary depending on ingredients used.
