Banoffee pie is a classic British dessert made with a biscuit crust, a rich caramel or dulce de leche filling, fresh bananas, and a generous layer of whipped cream. The name comes from combining the words “banana” and “toffee.” It is loved for its balance of buttery, creamy, fruity, and caramel flavors. Below is a detailed, long-form recipe that covers every step, ingredient, technique, and helpful tip to ensure excellent results.
Banoffee Pie
Preparation Time: About 45 minutes
Chilling Time: 4–6 hours or overnight
Servings: 10–12 slices
Ingredients
For the Biscuit Base
350 grams digestive biscuits or graham crackers
175 grams unsalted butter, melted
2 tablespoons brown sugar (optional, for extra flavor)
For the Caramel Filling
2 cans sweetened condensed milk (397 grams each)
50 grams unsalted butter
100 grams dark brown sugar
1 teaspoon vanilla extract
1/2 teaspoon sea salt
For the Banana Layer
4–6 ripe bananas
1 tablespoon lemon juice
For the Whipped Cream Topping
500 milliliters heavy whipping cream
3 tablespoons powdered sugar
1 teaspoon vanilla extract
For Garnish
Dark chocolate, finely grated
Chocolate curls
A light dusting of cocoa powder
Extra banana slices if desired
Caramel drizzle (optional)
Equipment Needed
23-centimeter pie dish or springform pan
Food processor or rolling pin
Mixing bowls
Medium saucepan
Electric mixer or whisk
Spatula
Sharp knife
Measuring cups and spoons
Instructions
Step 1: Preparing the Biscuit Base
Place the digestive biscuits or graham crackers into a food processor and pulse until they become very fine crumbs. If you do not have a food processor, place the biscuits in a sealed plastic bag and crush them thoroughly with a rolling pin.
Transfer the crumbs into a large mixing bowl. Pour in the melted butter and add the brown sugar if using. Stir until every crumb is coated and the mixture resembles wet sand.
Press the mixture firmly into the base and sides of your pie dish. Use the bottom of a measuring cup or a spoon to compact the crust evenly. The more firmly you press it, the better it will hold together when sliced.
Place the crust in the refrigerator for at least 30 minutes while preparing the filling. Chilling helps the butter solidify and creates a sturdy foundation.
Step 2: Making the Caramel Filling
There are several methods for creating caramel. The method below provides excellent flavor and texture.
Pour both cans of sweetened condensed milk into a medium saucepan.
Add the butter, brown sugar, and sea salt.
Place the saucepan over low to medium heat.
Stir constantly using a heatproof spatula or wooden spoon.
As the mixture heats, the sugar will dissolve and combine with the condensed milk. Continue stirring to prevent sticking or burning.
After about 10 to 15 minutes, the mixture will begin thickening and darkening in color. It should develop a smooth caramel consistency.
Once the caramel reaches a rich golden-brown shade and coats the back of a spoon, remove it from the heat.
Stir in the vanilla extract.
Allow the caramel to cool for about 10 minutes. It should remain spreadable but not be piping hot.
Step 3: Filling the Pie with Caramel
Remove the chilled biscuit crust from the refrigerator.
Pour the warm caramel into the prepared crust.
Use a spatula to spread it evenly across the entire surface.
Tap the pie dish gently on the counter a few times to remove any trapped air bubbles.
Return the pie to the refrigerator and chill for at least 1 hour, allowing the caramel layer to firm up.
Step 4: Preparing the Bananas
Choose bananas that are ripe but still firm. Overripe bananas can become mushy and release excess moisture.
Peel the bananas and slice them into rounds approximately 5 to 8 millimeters thick.
Place the banana slices in a bowl and lightly toss them with lemon juice. This helps slow browning and preserves their appearance.
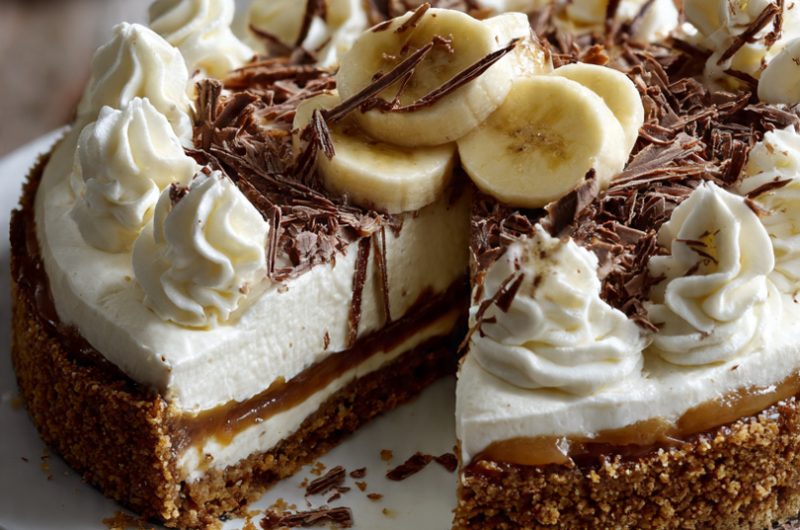
After the caramel layer has chilled, arrange the banana slices neatly over the entire surface. You may place them in concentric circles for an elegant appearance or simply create an even layer.
Some bakers prefer a double layer of bananas for a stronger banana flavor. If using extra bananas, arrange a second layer directly on top of the first.
Step 5: Preparing the Whipped Cream
Pour the cold heavy cream into a chilled mixing bowl.
Add the powdered sugar and vanilla extract.
Using an electric mixer, beat the cream on medium speed.
Continue beating until soft peaks form.
Increase speed slightly and beat until medium-stiff peaks develop. The cream should hold its shape but still look smooth and silky.
Be careful not to overwhip, as this can make the cream grainy and eventually turn it into butter.
Step 6: Finishing the Pie
Spread the whipped cream generously over the banana layer.
You can create decorative swirls with the back of a spoon or pipe the cream using a pastry bag fitted with a star tip.
Cover the entire banana layer so the fruit remains protected from air exposure.
Sprinkle finely grated dark chocolate over the whipped cream.
Add chocolate curls if desired.
For extra indulgence, drizzle a small amount of caramel sauce across the top.
A light dusting of cocoa powder can add an attractive finish and subtle bitterness that balances the sweetness.
Step 7: Chilling Before Serving
Place the completed pie in the refrigerator.
Allow it to chill for at least 2 to 4 more hours.
Overnight chilling often produces the best texture because all the layers settle and become easier to slice.
Step 8: Slicing and Serving
Use a sharp knife dipped in hot water.
Wipe the blade clean between slices.
Serve chilled.
Each slice should display distinct layers of biscuit crust, caramel filling, bananas, and whipped cream.
The pie pairs wonderfully with coffee, tea, espresso, hot chocolate, or a glass of cold milk.
Professional Tips for the Best Banoffee Pie
Use high-quality butter for a richer crust.
Always use cold cream when whipping.
Do not rush the caramel process; slow cooking develops deeper flavor.
Choose bananas that are yellow with only a few brown spots.
Allow sufficient chilling time for cleaner slices.
A springform pan makes removal easier and gives a bakery-style presentation.
If making ahead, add the whipped cream on the day of serving for maximum freshness.
For a deeper flavor, add a pinch of espresso powder to the caramel.
A small amount of flaky sea salt sprinkled on top can create a wonderful sweet-salty contrast.
Variations
Chocolate Banoffee Pie
Add 150 grams melted dark chocolate over the crust before adding the caramel. Allow it to set before continuing.
Coffee Banoffee Pie
Mix 1 teaspoon instant espresso powder into the caramel mixture.
Nutty Banoffee Pie
Add toasted pecans, walnuts, or hazelnuts between the caramel and banana layers.
Banoffee Cheesecake Pie
Fold softened cream cheese into the caramel layer for a richer texture.
Salted Caramel Banoffee Pie
Increase the sea salt slightly and finish with flaky salt on top.
Storage Instructions
Store covered in the refrigerator for up to 3 days.
The crust and caramel can be prepared 2 days in advance.
For best texture and appearance, consume within 24–48 hours after adding the bananas.
Freezing is generally not recommended because the bananas and whipped cream may change texture after thawing.
Why This Recipe Works
The biscuit crust provides a buttery, slightly crunchy base. The caramel contributes deep sweetness and a smooth texture. Fresh bananas add natural fruitiness and softness. Whipped cream lightens the dessert and prevents it from feeling overly rich. The chocolate garnish introduces a subtle bitterness that balances the sweetness of the caramel and bananas. Together, these elements create a dessert that is luxurious, flavorful, and satisfying, making banoffee pie one of the most beloved no-bake desserts in the world.
