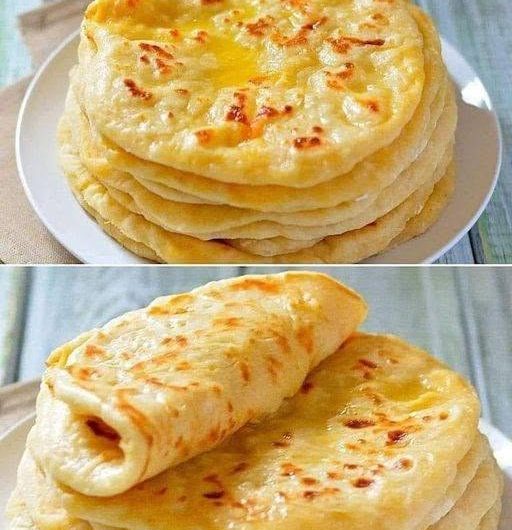

There are some breads that need a long list of ingredients, special equipment, or hours of preparation. This Turkish flatbread is not one of them. Bazlama is a soft, tender, pita-like flatbread that can be made with a bowl, a wooden spoon, your hands, and a pan on the stovetop.
What I like most about making it at home is how uncomplicated the dough is. There is no mixer involved, and the kneading is short. After the dough is mixed and worked into a smooth ball, it only needs a short 15-minute rest before it can be divided, rolled, and cooked.
The finished flatbreads are soft in the middle, lightly golden on the outside, and have a pleasant tang from the Greek yogurt. Fresh parsley adds a little color and flavor without making the bread complicated.
Bazlama is traditionally associated with Turkey and is often described as village bread. It is one of several types of Turkish flatbread, each with its own shape, texture, toppings, or cooking method. This version is especially convenient for a home kitchen because it cooks completely on the stovetop.
What Makes Bazlama Different?
- Flatbread is an old and widely loved style of bread. Many cultures have their own versions, and Turkey has several varieties of its own. Bazlama is particularly soft and tender, with a texture that makes it useful for everything from serving alongside soup to turning into a wrap.
- One ingredient that helps give this flatbread its characteristic texture is Greek-style yogurt. It adds moisture to the dough and gives the finished bread a mild tang. Combined with yeast, flour, water, olive oil, and salt, it creates a dough that is simple to work with.
- The dough doesn’t need a long rising period. Instead, the yeast is first activated in warm water with sugar. Once the mixture becomes foamy, the remaining ingredients can be added.
Start by Activating the Yeast
- The first thing I do is measure the warm water carefully. The water should be between 105 and 110°F. This temperature is important because water that is too hot can interfere with the yeast, while water that is too cool may not activate it properly.
- I add the warm water, active dried yeast, and sugar to a medium-large bowl and stir everything together. Then I leave the bowl in a warm place for about 5 to 10 minutes.
- There is no need to guess whether the yeast is working. After resting, the mixture should look foamy and bubbly. That is the sign that it has activated and is ready for the next ingredients.
- If you’re not accustomed to working with yeast, this is the only part that really needs a little attention. A kitchen thermometer makes checking the water temperature easy.
Mix the Yogurt and Olive Oil Into the Dough
- Once the yeast mixture is foamy, I whisk in the Greek-style yogurt, extra virgin olive oil, and kosher salt.
- Whole milk Greek yogurt works well here, although plain Greek yogurt can also be used. The yogurt should be mixed into the yeast mixture until everything is well combined.
- At this stage, the mixture will still look fairly loose. That’s exactly what I expect because the flour hasn’t been added yet.
Add the Flour and Parsley
- Next, I add the all-purpose flour and finely chopped flat-leaf parsley. I use a wooden spoon or sturdy spatula to stir everything together.
- The goal isn’t to make the dough perfectly smooth in the bowl. I simply mix until a shaggy dough forms.
- The amount of flour can vary a little. I start with the amount listed in the recipe and then judge the dough by its texture. If it is too sticky to handle, I add some additional flour as needed.
- The recipe allows for up to ½ cup of additional flour. I don’t add all of it automatically. Instead, I add just enough to make the dough manageable.
Give the Dough a Short Knead
- Once the dough has come together, I turn it onto a well-floured counter.
- This is where I gently work in enough additional flour to coat the dough and reduce the stickiness. A dough scraper is useful here, especially if the dough sticks to the counter or your hands.
- I knead only until the dough becomes a nice, smooth ball. There is no need for an extended kneading session.
- The important thing is to pay attention to the dough rather than adding flour simply because the recipe says you can. Different flour can absorb liquid differently, so the dough may need slightly more or less additional flour.
- If the dough is still sticky while kneading, I sprinkle the counter with a little more flour and continue working it until it forms a smooth ball.
Divide and Rest the Dough
- Once the dough is smooth, I divide it into 10 equal pieces.
- I lightly sprinkle the portions with flour and cover them with a clean kitchen towel. Then I let them rest for 15 minutes.
- This short rest makes the dough easier to roll. It also gives me enough time to heat the pan before I begin cooking the flatbreads.
- I don’t skip the resting step. Even though it is short, it makes the dough much easier to handle.
Roll the Flatbreads
- For a medium-thickness flatbread, I roll each portion into a circle approximately 7 inches in diameter.
- The size can be adjusted depending on how thick or thin I want the bread. Rolling the dough smaller gives a thicker flatbread, while rolling it into a larger circle makes it thinner.
- For this recipe, I prefer the medium thickness because it gives the bread enough softness and structure to serve with meals or use as a wrap.
- I work with one dough portion at a time and keep the remaining portions covered so they don’t dry out.
Get the Pan Hot
- While the dough rests, I preheat a medium sauté pan over medium-low heat.
- The exact heat setting can vary from stove to stove, so the first flatbread can be treated as a test. I want the pan hot enough for bubbles to appear on the top surface while the underside develops golden spots after roughly 45 seconds to 1 minute.
- If bubbles aren’t appearing, the heat probably needs to be increased. If the underside is becoming brown too quickly, I lower the heat.
- On my stove, a setting slightly below medium works well.
Cook the First Side
- Once the dough circle is ready, I lightly brush its top surface with extra virgin olive oil. The oil should cover the surface lightly without making the dough greasy.
- When the pan is hot, I pick up the dough circle and place it in the pan with the oiled side facing down.
- I then lightly brush the new top surface with olive oil.
- The flatbread cooks for approximately 1 to 1½ minutes on the first side. During this time, bubbles should begin appearing across the surface. The underside should have golden areas, especially around the edges and in a few spots.
- I don’t worry about making every flatbread look exactly the same. A few different golden patches are part of what makes homemade flatbread look so inviting.
Flip and Finish Cooking
Once the first side has cooked properly, I flip the flatbread.
- The second side only needs about 60 to 90 seconds. I look for a few small golden spots rather than waiting for the entire surface to become deeply browned.
- It’s important not to overcook the second side. The goal is a soft, tender flatbread rather than a crisp one.
- When the flatbread is finished, I transfer it out of the pan and continue with the remaining portions.
- I repeat the same process: roll a dough portion, brush it lightly with oil, cook the first side, flip it, and finish the second side.
Keep the Flatbreads Soft
- As each flatbread comes out of the pan, I stack them in a clean kitchen towel.
- The towel helps trap some of the steam, which keeps the bread soft and tender. This small step makes a noticeable difference, especially if I am cooking all 10 flatbreads one after another.
- If desired, I can sprinkle a little more chopped parsley over the finished flatbreads.
- They are especially good while still warm, when the bread is soft and fragrant.
Ways I Like to Serve It
- One of the best things about this flatbread is that it doesn’t need much to make it enjoyable.
- I can eat it plain, or use it as a simple snack with peanut butter and a drizzle of honey. It also works beautifully as a dinner bread alongside salads and soups.
- For a smaller serving, the dough can be divided into 14 or 16 portions instead of 10. The smaller flatbreads are convenient for putting into a bread basket and serving individually.
- For a more substantial meal, I can spread hummus down the center and add grilled or rotisserie chicken, diced tomatoes, cilantro, Kalamata olives, crumbled Feta, and a drizzle of dressing. Rolled up, the flatbread becomes an easy wrap.
- It can also be used as a quick flatbread pizza base. Add the desired toppings and bake for 5 to 8 minutes in a 450°F oven.
- For breakfast, I can fill one with scrambled eggs and bacon. It also works in place of ordinary bread for a favorite sandwich.
A Few Things That Make the Process Easier
- The flour is the ingredient I pay the most attention to while making this dough. The recipe calls for 3¾ cups, with additional flour as needed. Depending on the flour being used, the dough may need a little extra to reach the right consistency.
- I add additional flour gradually rather than adding a large amount at once. The finished dough should come together into a smooth ball without remaining excessively sticky.
- I also keep the oiling light. The purpose of brushing the dough with olive oil is to lightly coat the surface, not to make the flatbread greasy.
- The pan temperature is another important detail. Since every stove heats differently, the first flatbread gives me a chance to adjust the heat. If the bread isn’t bubbling, I turn the heat up slightly. If it is browning too quickly, I turn it down.
Storing and Reheating
- If I have leftover flatbreads, I let them cool and then place them in a ziplock bag.
- To warm them again, I can put them into a pan without oil and heat for a minute or two on each side. Another option is to wrap them in paper toweling and warm them in the microwave on low power until heated through.
- Freshly cooked Bazlama is hard to resist, but the leftovers are still useful for sandwiches, wraps, breakfast, or quick meals.
- The recipe makes 10 flatbreads, so there is plenty to serve immediately and enough to save for later
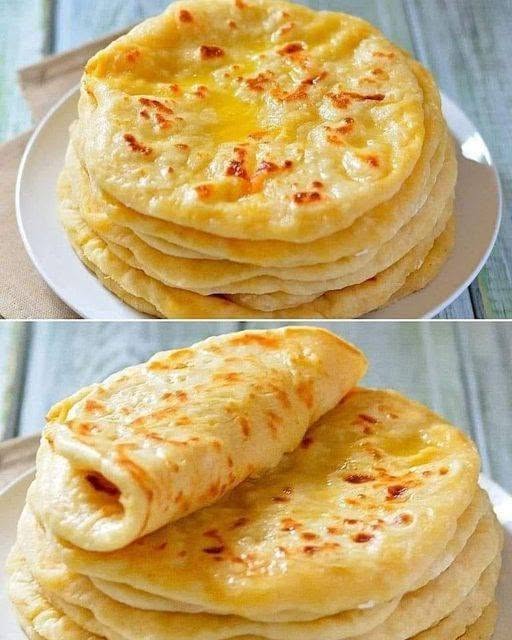
Low Carb Turkish Flatbread
Soft, tender Turkish-style flatbreads made with Greek-style yogurt, yeast, flour, olive oil, and fresh parsley. The dough requires minimal kneading and only a short 15-minute rest before the flatbreads are rolled and cooked in a pan on the stovetop.
10
servings35
minutes25
minutes209
kcalIngredients
1¼ cups warm water, 105–110°F
2¼ teaspoons active dried yeast, 1 packet
1 tablespoon sugar
¾ cup Greek-style yogurt
2 tablespoon extra virgin olive oil
2 teaspoons kosher salt
3¾ cups all-purpose flour, more as needed and for the counter
¼ cup finely chopped flat leaf parsley
Directions
- Add the warm water, active dried yeast, and sugar to a medium-large bowl. Stir well and let the mixture sit in a warm place for 5–10 minutes, until foamy and bubbly.
- Whisk in the Greek yogurt, extra virgin olive oil, and kosher salt
- Add the flour and finely chopped parsley. Stir with a wooden spoon or sturdy spatula until a shaggy dough forms.
- Turn the dough onto a well-floured counter. Gently work in enough additional flour to coat the dough and reduce the stickiness. Up to ½ cup additional flour may be needed.
- Divide the dough into 10 equal portions. Sprinkle them lightly with flour and cover with a clean kitchen towel. Let rest for 15 minutes.
- Heat a medium sauté pan over medium-low heat. While the pan heats, roll one dough portion into a circle approximately 7 inches in diameter.
- Lightly brush the top of the dough with extra virgin olive oil.
- Place the dough into the hot pan with the oiled side facing down. Lightly brush the top side with olive oil.
- Cook for about 1–1½ minutes, until bubbles appear across the top and the underside is golden around the edges and in spots.
- Flip and cook for another 60–90 seconds, until a few small golden spots appear. Avoid overcooking the second side.
- Repeat the rolling, oiling, and cooking process with the remaining dough portions.
- Sprinkle with additional chopped parsley, if desired. Stack the cooked flatbreads in a clean kitchen towel to help retain their softness.
- Once cool, store in a ziplock bag.
- To reheat, warm in a pan without oil for 1–2 minutes per side, or wrap in paper toweling and microwave on low power until warm.
Notes
- The amount of additional flour can vary depending on the flour used. Add it gradually until the dough forms a smooth, manageable ball.
- If the dough remains sticky while kneading, sprinkle the counter with additional flour as needed.
- Keep the olive oil coating light; the dough should be coated without becoming greasy.
- Greek-style yogurt can be whole milk or another plain Greek yogurt variety.
- The cooking temperature may need adjustment depending on your stove. The flatbread should develop bubbles on top and golden spots underneath without browning too quickly.
- For smaller flatbreads, divide the dough into 14 or 16 portions instead of 10
- Roll the dough smaller for thicker flatbreads or larger for thinner ones.
- For flatbread pizza, add toppings and bake for 5–8 minutes at 450°F.
- The cooked flatbreads can be served plain, with spreads, alongside soups and salads, or used for wraps, sandwiches, and breakfast fillings.
Nutrition Facts
- Calories: 209kcal
- Fat: -1g
- Saturated Fat: 0.5g
- Trans Fat: 0.001g
- Polyunsaturated Fat: 0.5g
- Monounsaturated Fat: 2g
- Cholesterol: 1mg
- Sodium: 472mg
- Potassium: 71mg
- Carbohydrates: 38g
- Fiber: 1g
- Sugar: 2g
- Protein: 6g
- Vitamin A: 1mcg
- Calcium: 24mg
- Iron: 2mg
