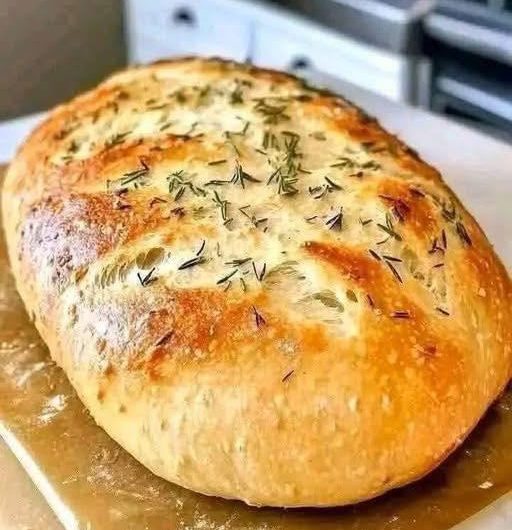
This no-knead gluten-free bread is designed to produce a soft interior with a pleasantly chewy texture and a crisp crust. Because gluten-free dough behaves differently from traditional wheat dough, the recipe relies on a carefully balanced blend of gluten-free flours and a binder such as psyllium husk to provide structure.
Yield
1 large loaf (approximately 10–12 slices)
Preparation Time
- Preparation: 20 minutes
- Resting and rising: 1½–2 hours
- Baking: 50–60 minutes
- Cooling: 2 hours
Ingredients
Dry Ingredients
- 2 cups (280 g) gluten-free bread flour blend
- 1 cup (120 g) brown rice flour
- ½ cup (60 g) oat flour (certified gluten-free)
- ¼ cup (35 g) tapioca starch
- 2 tablespoons psyllium husk powder
- 1 teaspoon xanthan gum (optional if your flour blend already contains it)
- 2 teaspoons fine sea salt
- 1 tablespoon granulated sugar
- 2¼ teaspoons instant yeast (1 standard packet)
Wet Ingredients
- 2 cups (480 ml) warm water, about 105–110°F (40–43°C)
- 1 tablespoon apple cider vinegar
- 2 tablespoons olive oil
- 1 tablespoon honey or maple syrup
For Dusting
- Extra gluten-free flour
- Rice flour or cornmeal
Equipment
- Large mixing bowl
- Wooden spoon or sturdy spatula
- Measuring cups and spoons
- Kitchen scale (recommended)
- Dutch oven with lid or heavy baking pot
- Parchment paper
- Cooling rack
Understanding the Ingredients
Gluten-free bread requires different ingredients because gluten is responsible for the elasticity and structure found in traditional bread. Without gluten, bread can become dense, crumbly, or dry.
Brown rice flour provides body and a mild flavor. Oat flour contributes softness and moisture retention. Tapioca starch helps create a lighter texture and some chewiness. Psyllium husk is especially important because it absorbs water and forms a gel that mimics some of gluten’s structural properties. Yeast provides rise and flavor development, while vinegar helps strengthen the dough and improves texture.
Step 1: Prepare the Dry Mixture
In a large mixing bowl, combine:
- Gluten-free flour blend
- Brown rice flour
- Oat flour
- Tapioca starch
- Psyllium husk powder
- Xanthan gum
- Salt
- Sugar
- Instant yeast
Whisk thoroughly for at least 1–2 minutes. This step is important because gluten-free ingredients tend to settle unevenly. A uniform mixture helps ensure consistent hydration and rise.
Make sure there are no lumps of psyllium husk or xanthan gum, as these can create gummy spots in the finished loaf.
Step 2: Mix the Wet Ingredients
In a separate bowl or large measuring cup, combine:
- Warm water
- Apple cider vinegar
- Olive oil
- Honey or maple syrup
Stir until the sweetener dissolves completely.
The water should feel warm but not hot. Excessively hot water can damage the yeast and reduce the bread’s rise.
Step 3: Form the Dough
Pour the wet ingredients into the bowl of dry ingredients.
Using a wooden spoon or sturdy spatula, mix thoroughly until no dry flour remains.
At first the mixture may seem extremely wet and sticky. Continue mixing for 2–3 minutes.
As the psyllium husk absorbs water, the dough will gradually thicken and become more cohesive.
Unlike traditional bread dough, this dough will not become smooth and elastic. It should resemble a very thick batter or sticky dough.
Scrape down the sides of the bowl and ensure all ingredients are fully incorporated.
Step 4: Rest the Dough
Allow the dough to sit for 10 minutes.
During this resting period, the psyllium husk and flours absorb moisture.
You will notice that the dough becomes noticeably thicker and easier to handle.
This short rest greatly improves the final structure of the bread.
Step 5: Shape the Dough
Lightly dust a work surface with gluten-free flour.
Transfer the dough onto the surface.
Because the dough is sticky, lightly flour your hands.
Shape the dough into a round loaf by gently folding the edges toward the center.
Do not attempt to knead.
The goal is simply to create a rough round shape while maintaining as much trapped air as possible.
If the dough feels excessively sticky, lightly dust with additional flour, but avoid adding too much because extra flour can make the bread dry.
Step 6: First Rise
Line a bowl with parchment paper or lightly oil a proofing basket.
Place the shaped dough inside.
Cover loosely with plastic wrap or a clean kitchen towel.
Allow the dough to rise in a warm place for approximately 60–90 minutes.
The dough should increase in volume by roughly 50–75%.
Gluten-free dough rarely doubles dramatically like wheat-based dough.
Avoid overproofing because it can cause the loaf to collapse during baking.
Step 7: Preheat the Oven
About 30 minutes before baking, place a Dutch oven with its lid into the oven.
Preheat the oven to 450°F (230°C).
The Dutch oven should become thoroughly heated.
This trapped heat creates steam during baking and helps produce a crisp crust.
Step 8: Check Dough Readiness
The dough is ready when:
- It appears puffed and airy.
- The surface looks slightly expanded.
- A gentle finger press leaves a slight indentation that slowly springs back.
If the dough springs back immediately, it may need more rising time.
If the indentation remains deep and the dough appears fragile, it may be overproofed.
Step 9: Transfer to the Dutch Oven
Carefully remove the hot Dutch oven from the oven.
Lift the dough using the parchment paper.
Place the dough and parchment directly into the hot Dutch oven.
Be careful because the pot is extremely hot.
If desired, lightly dust the top with rice flour for a rustic appearance.
Using a sharp knife, make a shallow slash across the top.
The slash helps control expansion during baking.
Step 10: Covered Baking Phase
Cover the Dutch oven with its lid.
Bake for 35 minutes at 450°F (230°C).
During this stage, trapped steam allows the bread to expand fully before the crust hardens.
This process is known as oven spring.
The loaf should noticeably increase in size.
Step 11: Uncovered Baking Phase
After 35 minutes, carefully remove the lid.
Reduce oven temperature to 425°F (220°C).
Continue baking for an additional 15–25 minutes.
The crust should become deep golden brown.
The loaf should sound hollow when tapped on the bottom.
For maximum accuracy, use an instant-read thermometer.
The internal temperature should reach approximately 205–210°F (96–99°C).
Step 12: Cooling
Remove the bread from the Dutch oven immediately.
Place it on a cooling rack.
Allow the loaf to cool for at least 2 hours before slicing.
This step is essential.
Freshly baked gluten-free bread continues setting internally as it cools.
Cutting too soon can result in a gummy texture.
Patience during cooling greatly improves the final crumb.
Expected Results
A properly baked loaf should have:
- Crisp golden crust
- Moist interior
- Tender crumb
- Mild flavor
- Good sliceability
- Minimal crumbling
The bread should hold together well for sandwiches, toast, and general use.
Storage Instructions
At Room Temperature
Store in an airtight container for up to 2 days.
Refrigerator
Store for up to 5 days.
Warm slices slightly before serving for the best texture.
Freezer
Slice the loaf completely before freezing.
Place parchment paper between slices if desired.
Store in a freezer-safe bag for up to 3 months.
Individual slices can be toasted directly from frozen.
Variations
Seeded Gluten-Free Bread
Add:
- 2 tablespoons sunflower seeds
- 2 tablespoons pumpkin seeds
- 1 tablespoon sesame seeds
- 1 tablespoon flaxseeds
Mix into the dough before rising.
Herb Bread
Add:
- 1 teaspoon dried rosemary
- 1 teaspoon dried thyme
- ½ teaspoon garlic powder
These ingredients create a savory loaf ideal for soups and sandwiches.
Multigrain Version
Replace part of the brown rice flour with:
- Sorghum flour
- Millet flour
- Buckwheat flour
This variation provides deeper flavor and improved nutrition.
Honey Oat Bread
Increase honey to 2 tablespoons and sprinkle gluten-free rolled oats over the top before baking.
The result is a slightly sweeter breakfast-style loaf.
Troubleshooting Guide
Bread Is Too Dense
Possible causes:
- Insufficient rising time
- Old yeast
- Too much flour
- Not enough water
Bread Is Gummy
Possible causes:
- Underbaking
- Cutting before fully cooled
- Excess moisture
Bread Collapses
Possible causes:
- Overproofing
- Excess water
- Weak flour blend
Crust Is Too Hard
Possible causes:
- Overbaking
- Low dough hydration
- Excessive baking time after removing the lid
Bread Crumbles Easily
Possible causes:
- Insufficient psyllium husk
- Missing xanthan gum when required
- Too little moisture
Serving Ideas
This bread works well for:
- Toast with butter and jam
- Avocado toast
- Sandwiches
- French toast
- Garlic bread
- Bread pudding
- Soup accompaniment
- Bruschetta
- Grilled sandwiches
- Breakfast toast with eggs
When prepared carefully and allowed to cool completely, this no-knead gluten-free bread develops a flavorful crust, moist crumb, and excellent texture without any kneading, making it one of the simplest and most reliable homemade gluten-free bread recipes.v
